Micro Ace diesel loco conversions
> main > modeller's corner > couplers > Micro Ace > DE10 diesel
Micro Ace DE10 diesel loco conversion
Micro Ace DE10 diesel loco ref.A8701 (JR red) or A8708 (Watarase Valley Railway, brown and gold)
Skill level: Extremely high! Even harder than the E10 described in the steam tank loco section.
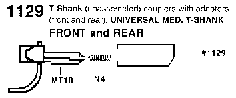
Coupler used: MT #1129
Conversion by Phil Hendry
It's a real bear to do, and not recommended unless you're *really* good with a scalpel (brain surgeons only!). I spent 2 1/2 hours on it (which is about the longest I've ever spent on a conversion). It looks fine and works as it should, but it was *really* tricky work (worse than the E10).
Use an #1129 (#1128 is too short for this application IMHO). Remove loco body from frame (it pushes off- but is really tight- it seems as though it won't come off but it will).
Take the walkway moulding off the cab and hoods. Unscrew the plough and remove the coupler and spring. Keep the screws and the plough- you'll need those to put it all back together again.
Cut the back of the coupler pocket out with razor saw (a very small one- I have one which fits in a Swann-Morton No.3 scalpel handle) and deepen the pocket by quite a bit (I didn't measure how much)- you also need to widen (slightly) the slot in the pilot and deepen it too- N.B. you must be very careful to end up with a flat, level surface to mount the coupler against.
The best way is to keep putting the coupler adaptor in the pocket and try fitting the plough- once the plough fits properly the pocket is wide and deep enough.
Now glue a piece of styrene (0.010", 0.25mm thick) into the 'recess' at the very back of the coupler pocket (a piece about 4mm x 5.5mm is about right sized). It mustn't be any thicker or you won't get the body back on the chassis (believe me!). The walkway moulding is ABS (I think!) and won't glue with 'ordinary' styrene cement- I used Daywat Poly and it stuck really well. I used white styrene, so a spot of paint was called for at this point.
Assemble the coupler in the adaptor and slip into the pocket you've made. Put the plough in place and re-fit the screws.
Put loco back together.
Check coupler heights- if you've done the job right they should be spot-on otherwise you may need to shim the adaptor a little.
Check and adjust the trip-pin heights and the job is done. You may find the coupler doesn't have enough 'swing' (the Ts may catch on the screw housings)- in which case remove about 0.5mm of plastic from the ends of the Ts of the T-shanks and re-assemble.
That's it, much easier to describe than to do!
![]() Back to the
Micro Ace MT conversions.
Back to the
Micro Ace MT conversions.
![]() Modelling
Modelling ![]() Layouts
Layouts ![]() Modeller's
Corner
Modeller's
Corner ![]() Train
Simulators
Train
Simulators ![]() Various
Various