Model trees
> main > modeller's corner > trees
A model railway is not complete without the scenery. An important
part of a landscape is the greenery, i.e. trees, hedges and shrubs.
In this article I will describe a method to aid you to make your own
model trees that are realistic, strong, cheap and easy to make. All
the tools you need are a pair of scissors, a brush, a wire cutter and
some clamps.
![]() List of tools
List of tools
- a pair of scissors
- a
small paintbrush
- wire cutter
-
clamps, the ones used for hanging the washing on the lines are
perfect (and cheap)
![]() List of materials
List of materials
- Metal wire, prreferably steel, but copper
strands from electrical leads are also OK. I use plastified wire that
is normally used for binding flowers.
- Cotton
thread, any brown, white or grey colour will do, stay away from
bright colours. Use a thick thread (about 1- 1.5 mm)
-
Single component contact adhesive, like Bison-Kit, Bostik or
Walther's Goo.
- Foliage material, select a few
colours from various manufacturers, personally I like Woodland
Scenics and Busch, but there are other makes as well.
Use different colours for variety.
- Water
soluable paint in a brown or grey colour, please observe real trees
for an impression of the colour. Always use flat colours.
-
Woodland Scenics 'turf' or ground bark. Similar material is available
from other manufacturers.
- PVA glue or special
'leaf adhesive' (made by Faller).
- Hairspray
- Some patience and time
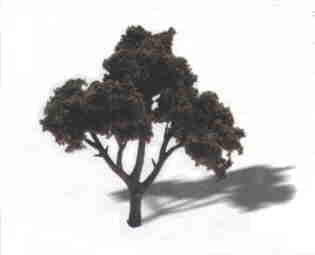 Your trees can look as good as this one!
![]() How to make your trees
How to make your trees
First, cut 12 to 18 lengths of wire to a length some 12 to 18
centimeters (4 to 6 inches). Then twist the wires into a basic tree
shape (trunk and branches). then apply the adhesive on the trunk and
the base of the branches. Wind the cotton thread around the trunks
whilst the adhesive is still wet ad allow you tree to dry for about
24 hours. Then paint the trunk and the branches, do not forget the
ends of the branches!
Then leave to dry again. Then apply PVA to
the trunk and glue brown 'turf' or ground bark to the trunk. Leave to
dry once more (24 hours).
The final stage is to give your tree
its leaves. Woodland Scenics foliage is an ideal material as it comes
in a variety of natural looking colours, it is colourfast and easy to
work with. Please follow the instructions on the bag.
You could
use foliage of other manufacturers, I would also recommend Green
Scene and Busch, the material is very similar.
Finally, spray
your tree with hairspray, a single blow from the spraycan is enough.
Any more will cause an ugly 'frosting' effect that spoils all your
work, so be careful.
An alternative for hairpray is diluted
latex. At this moment I have not tried it yet.
To speed up your production it is best to make batches
of 5 to 10 trees at a time. This batch size is large enough to make a
quantity of trees in a given time, but small enough to avoid getting
you bored with doing the same for hours and hours!
Give this
method a try, you will like the results!
Silhouettes of different trees to help you 'growing' your model trees.
If you find this method for modelling trees too laborious, I developed a quicker method which provide good results albeit less detailed. More information in the Quick trees section.
Text by Mark Veneman
Back to the modeller's corner
Modelling
Layouts
Modeller's Corner
Train Simulators
Various